Table of Contents
Introduction
Welcome to the Ultimate Guide on how to clean laptop keyboard under keys. Your laptop keyboard is the gateway to your digital world, facilitating countless hours of work, play, and communication. But have you ever stopped to consider what lies beneath those keys? Dust, crumbs, and who knows what else can accumulate under there, affecting not only the aesthetics but also the functionality of your trusty keyboard.
In this comprehensive guide on how to clean laptop keyboard under keys, we’re diving deep into the often-neglected realm under your laptop keyboard keys. We’ll explore the importance of maintaining a clean keyboard, the benefits of tackling the area under the keys, and, most importantly, how to effectively clean it.
Whether you’re an old tech fan or a casual user, learning the art of how to clean laptop keyboard under keys is a skill that can prolong the life of your device and ensure a smoother typing experience. So, let’s roll up our sleeves and get ready to clean those hidden keyboard dirt once and for all.
Preparation
Before we dive into the details of how to clean laptop keyboard under keys, it’s important to gather the right tools and set the stage for a successful cleaning session. Here is the preparation you’ll need.
1. Cleaning Tools
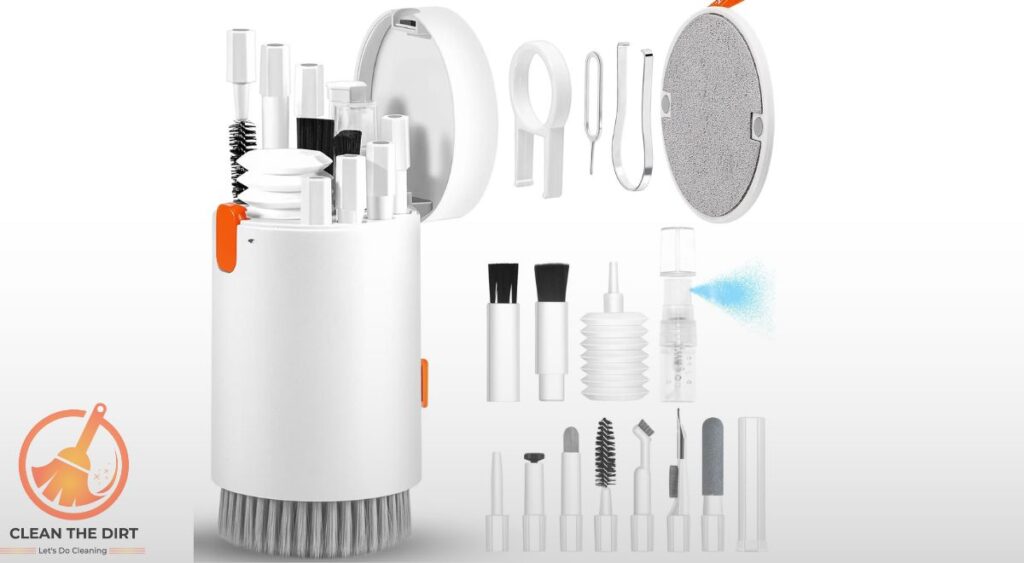
Gather soft brushes, compressed air cans, cotton swabs, and a microfiber cloth. These tools will help you reach and remove debris from those hard-to-reach places under the keys.

2. Cleaning Solution (Optional)
If your keyboard has stubborn stains or sticky residue, you may want to use a gentle cleaning solution. Mix a small amount of mild dish soap with water or use a specialized electronics cleaning solution.
3. Workspace Preparation
Find a well-lit and spacious area to work on your laptop. Ideally, you should work on a flat surface to prevent any keys or small parts from rolling away. Consider placing a soft cloth or towel under your laptop to protect it from scratches.
4. Power Off and Disconnect
Before you begin cleaning, make sure to power off your laptop and disconnect it from any power sources. This will prevent any accidental damage to your device and ensure your safety throughout the cleaning process.
By taking the time to gather the necessary tools and prepare your workspace, you’ll set yourself up for success as you embark on the journey of cleaning under laptop keyboard keys. So, let’s get ready to give your keyboard the attention provided below in this guide on how to clean laptop keyboard under keys.
How to Clean Laptop Keyboard Under Keys? A Step-by-Step Cleaning Process
Now that you’re all set up and ready to go, let’s walk through the how to clean laptop keyboard under keys process step by step.
1. Remove External Debris
Start by using a soft brush or compressed air can to gently remove any visible debris from the surface of your keyboard. Pay special attention to the area around the keys where dust and crumbs tend to accumulate.
2. Power Off and Disconnect
As a safety precaution, power off your laptop and disconnect it from any power sources before proceeding with the cleaning process.
3. Remove Keys (If Necessary)
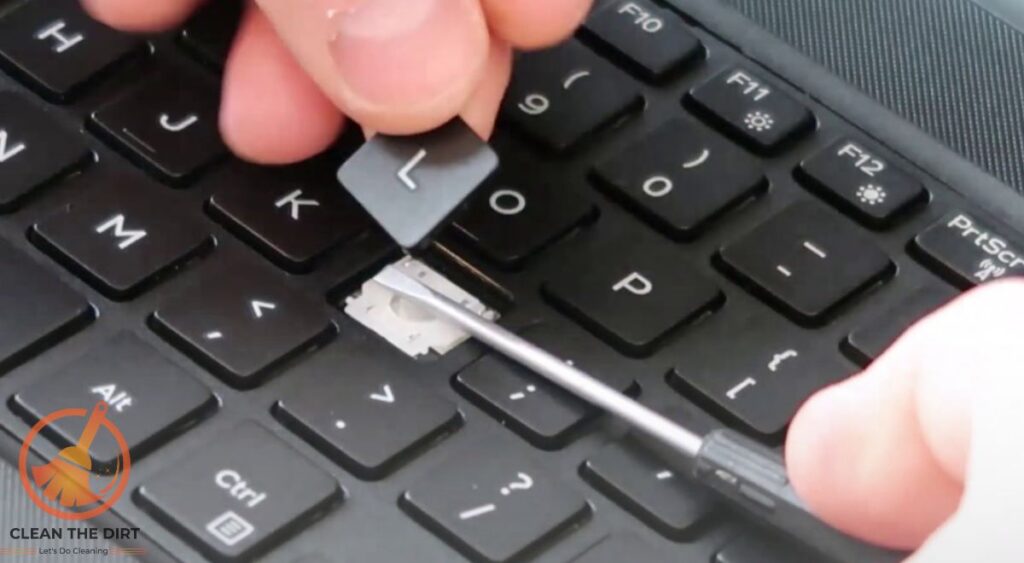
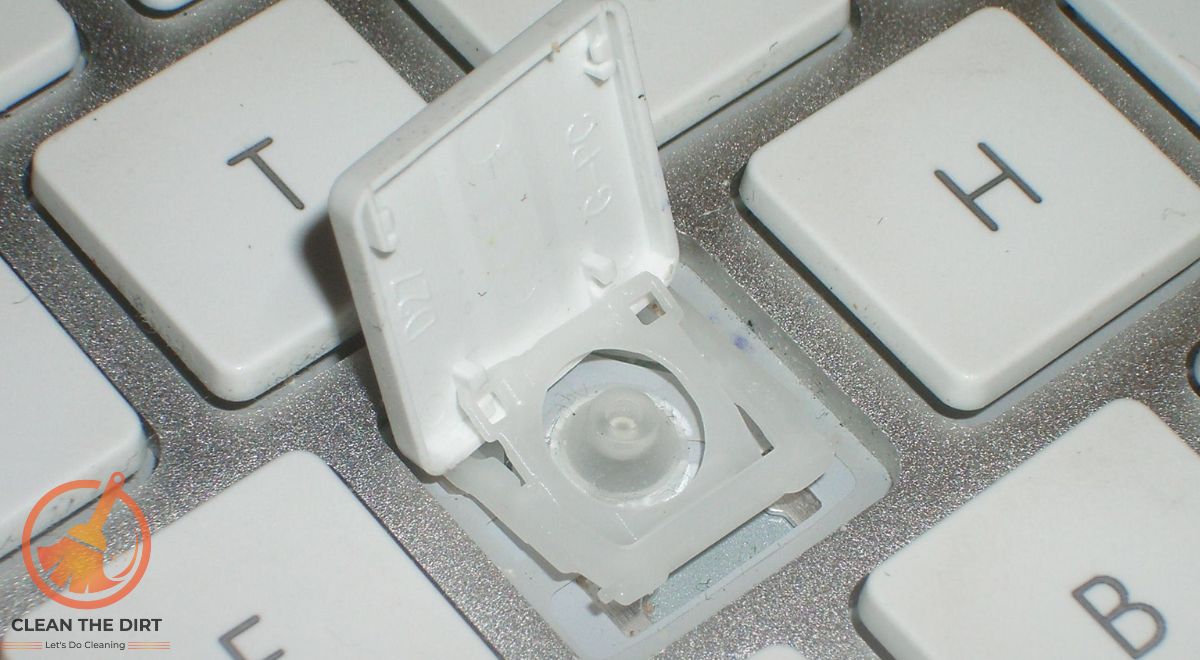
Depending on your laptop model and personal preference, you may choose to remove the keys for a more thorough cleaning. Use a keycap puller or a small flat tool to carefully pry up the keys, taking care not to damage the underlying mechanisms.
4. Clean Keys Separately
If you’ve removed the keys, take this opportunity to clean them separately using a mild cleaning solution and a soft cloth. Gently wipe each key to remove any dirt or grime, then set them aside to dry completely.
5. Clean Under Keys
Now it’s time to focus on the area under the keys. Use a can of compressed air to blow away any remaining debris, working your way across the keyboard from left to right and top to bottom. Alternatively, you can use a soft brush or cotton swab to gently remove stubborn dirt.
6. Spot-Clean Stains
If you encounter any stubborn stains or sticky residue, dampen a cotton swab with a small amount of cleaning solution and carefully spot-clean the affected areas. Be sure to use minimal moisture to avoid damaging the internal components of your laptop.
7. Dry Thoroughly
Once you’ve finished cleaning, allow your laptop keyboard to air dry completely before reassembling the keys and powering it back on. This will help prevent any moisture from causing damage to your device.
8. Reassemble and Test
Carefully reassemble the keys in their original positions, making sure they snap securely into place. Once everything is back together, test the keyboard to ensure that all keys are functioning properly.

By following these simple steps, you can effectively act on this guide on how to clean laptop keyword under keys and keep your device in tip-top shape for years to come.
Why Cleaning Under Laptop Keyboard Keys is Important
You might be surprised to learn just how much gunk can accumulate beneath the keys of your laptop keyboard. From stray crumbs to dust bunnies, the space under those keys can become a shelter for all sorts of debris. It would help if you cleaned all your devices and gadgets after they become dirty. Cleaning gadgets like cleaning airpod microphones, cleaning headphone pads, etc. It will maximize your device’s useability and the lifespan of your device. Let’s take a look at the importance of cleaning the keyboard under the keys mentioned below in this guide on how to clean laptop keyboard under keys.
1. Performance Optimization
Over time, debris under the keys can interfere with the mechanisms that register key presses, leading to sticky or unresponsive keys. By cleaning under laptop keyboard keys regularly, you can maintain optimal performance and ensure smooth typing.
2. Hygiene Matters
Imagine that your fingers come into contact with your keyboard every day, and all that grime under the keys is a breeding ground for bacteria and germs. Regular cleaning under laptop keyboard keys can help minimize the risk of spreading germs and keep your workspace cleaner and healthier.
3. Prolonged Lifespan
Dust and debris can also find their way into the internal components of your laptop, potentially causing damage over time. By cleaning under laptop keyboard keys and keeping your keyboard and internals free from buildup, you can help prolong the lifespan of your device.
4. Enhanced Aesthetics
It’s a fact that having a neat and organized workplace is more pleasant. Removing the dirt and grime from under your keyboard keys can not only improve the aesthetics of your laptop but also boost your overall mood and productivity.
In short, cleaning under laptop keyboard keys isn’t just about appearances, it’s about optimizing performance, maintaining hygiene, and protecting your investment in your trusty laptop. So, let’s get ready to give those keys the little effort they deserve.
Tips for Effective Cleaning
The process of how to clean laptop keyboard under keys can be a delicate task, but with the right approach, you can achieve excellent results. Here are some tips to help you clean your laptop keyboard under keys effectively.
1. Use Gentle Tools
When cleaning under the keys, opt for soft brushes, cotton swabs, and compressed air cans to avoid causing damage to the delicate components of your keyboard.
2. Work Methodically
Take your time and work methodically across the keyboard, ensuring that you cover every area under the keys. Start from one end and work your way to the other, paying attention to any particularly dirty or sticky spots.
3. Mind the Moisture
While a gentle cleaning solution can help remove stubborn stains, be careful not to use excessive moisture. Too much liquid can seep into the keyboard and cause damage to the internal components. Always use a damp cloth or cotton swab rather than pouring liquid directly onto the keyboard.
4. Patience is Key
If you encounter stubborn debris or stains, don’t try to use excessive force. Instead, be patient and persistent, gently working to loosen the dirt without risking damage to your keyboard.
5. Regular Maintenance
To prevent buildup under the keys, make cleaning laptop keyboard under keys a regular part of your maintenance routine. Aim to clean your keyboard at least once every few months, or more frequently if you use your laptop in dusty or dirty environments.
6. Protective Measures
Consider using a keyboard cover or skin to help protect your keyboard from spills, dust, and debris. These inexpensive accessories can go a long way toward keeping your keyboard clean and functioning properly.
7. Avoid Harsh Chemicals
When cleaning your keyboard, avoid harsh chemicals or abrasive cleaning agents. Stick to mild solutions and gentle cleaning tools to avoid damaging the delicate surfaces of your keyboard.
By following the tips mentioned above in this guide on how to clean laptop keyboard under keys, you can ensure that your cleaning laptop keyboard under keys efforts are effective, safe, and gentle on your device. So grab your cleaning tools and get ready to give your keyboard the care it deserves.
Reassembly and Testing
Now that you’ve learned how to clean laptop keyboard under keys, it’s time to put everything back together and ensure everything is in working order. Follow these steps for a smooth reassembly process.
1. Key Placement
Carefully place each key back onto its respective position on the keyboard. Ensure that each key snaps securely into place and sits clean with the surrounding keys.
2. Double-Check Alignment
Take a moment to double-check the alignment of the keys and ensure that they are not twisted or misaligned. Proper alignment is essential for optimal keyboard functionality.
3. Test Each Key
Once all the keys are reattached, test each key individually to ensure it registers properly when pressed. Type a few sentences or run a keyboard testing program to verify that all keys are functioning as they should.

4. Check for Stickiness
Pay close attention to any keys that feel sticky or unresponsive during testing. If you encounter any issues, remove the affected key and clean it again to ensure that no residue is left behind.
5. Power On
After confirming that all keys are functioning correctly, power on your laptop and test the keyboard in normal use. Type a few sentences, navigate through menus, and perform any other tasks to ensure that the keyboard is working smoothly.
6. Final Inspection
Once you’re satisfied with the keyboard’s performance, take a final look at the entire keyboard assembly to ensure that everything looks clean and neat. Wipe down the surface with a dry cloth if necessary to remove any fingerprints or smudges.
By following the steps delivered above in this guide on how to clean laptop keyboard under keys, you can confidently reassemble your laptop keyboard after cleaning under keys and ensure that everything is in proper working order. So go ahead, reattach those keys, power on your device, and enjoy the satisfaction of a clean and functional keyboard!
Conclusion
Congratulations on completing the journey of how to clean laptop keyboard under keys. You’ve taken an important step toward maintaining the health and functionality of your laptop keyboard, and your efforts will surely pay off in the long run.
By learning how to effectively clean laptop keyboard under keys, you’ve not only improved the aesthetics of your device but also optimized its performance and extended its lifespan. Regular maintenance is key to keeping your keyboard in top condition, so be sure to incorporate cleaning laptop keyboard under keys into your device care routine regularly.
Remember, a clean keyboard isn’t just about appearances, it’s about ensuring a comfortable and hygienic typing experience while also protecting your investment in your trusty laptop. So keep those keys free from debris, stay proactive with your cleaning efforts, and enjoy the satisfaction of a clean and well-maintained keyboard.
Now let’s have a look at the table that indicates the laptop keyboard cleaning methods and their pros and cons.
| Cleaning Tool/Method | Description | Pros | Cons |
|---|---|---|---|
| Compressed Air | Uses pressurized air to dislodge dust and debris from under the keys. | Quick and easy to use | May not remove sticky residue |
| Soft Brush | Uses a soft-bristled brush to gently sweep away dust and debris. | Safe for delicate components | May not be effective for sticky residue |
| Cleaning Gel | Sticky gel compound that molds to the contours of the keyboard, trapping debris. | Effective at lifting dirt and crumbs | May leave residue on keys |
| Cotton Swabs | Allows for precision cleaning in tight spaces between keys. | Ideal for targeting specific areas | Can leave cotton fibers behind |
| Isopropyl Alcohol Solution | Diluted alcohol solution used to disinfect and remove stubborn stains. | Effective at removing grease and grime | Can damage certain keyboard materials |
Thank you for joining us on this journey of how to clean laptop keyboard under keys. We hope you found the information and tips helpful, and we wish you many happy hours of smooth and uninterrupted typing on your freshly cleaned keyboard.
Frequently Asked Questions (FAQs)
Why is it important to clean under laptop keyboard keys?
Cleaning under laptop keyboard keys is important to remove dust, crumbs, and other debris that can accumulate over time. This buildup can affect the performance of your keyboard and even lead to hygiene issues if left unchecked.
How often should I clean under my laptop keyboard keys?
The frequency of cleaning under laptop keyboard keys depends on factors such as usage patterns and environmental conditions. As a general guideline, aim to clean your keyboard every few months to prevent the buildup of debris.
Can I use water to clean under my laptop keyboard keys?
While a small amount of water can be used in conjunction with a mild cleaning solution, it’s important to exercise caution to avoid getting moisture into the internal components of your keyboard. Always use a damp cloth or cotton swab rather than pouring water directly onto the keyboard.
What tools do I need to clean under my laptop keyboard keys?
Useful tools for cleaning under laptop keyboard keys include soft brushes, compressed air cans, cotton swabs, and a mild cleaning solution. These tools can help dislodge debris without causing damage to delicate keyboard components.
Is it safe to remove laptop keyboard keys for cleaning?
Removing laptop keyboard keys can be done safely if done with care and the right tools. However, it’s important to exercise caution to avoid damaging the underlying mechanisms. Refer to your laptop’s user manual or online guides for instructions on safely removing and reattaching keys.
What should I do if my keyboard keys are sticky after cleaning?
If your keyboard keys feel sticky after cleaning, residue from the cleaning solution may be causing the issue. Use a damp cloth or cotton swab to gently remove any remaining residue, then allow the keys to air dry completely before retesting.
Can I use a vacuum cleaner to clean under my laptop keyboard keys?
While a vacuum cleaner with a soft brush attachment can be used to remove surface debris, it’s not recommended for cleaning under laptop keyboard keys. Vacuum cleaners can generate static electricity, which may damage delicate keyboard components. Compressed air cans are a safer option for removing debris from under the keys.
You May Also Like: How to Clean Battery Corrosion in Toys? The Ultimate Guide


